|
The screen of your computer allows you to perform the same operations as a mouse by touching its surface.
<Only for model with digitizer>
The computer supports, using the digitizer pen (included) and your fingers.
<Only for model with touchscreen>
The computer supports, using the stylus (included) and your fingers.
For further information:

Open the Control Panel, and then click [Hardware and Sound] - [Pen and Touch] - [Flicks] - [Practice using flicks].
To open the Control Panel, proceed as follows on the Start screen.
- Right-click any empty location on the Start screen.
- Click [All apps] on the toolbar.
- Click [Control Panel] under “Windows System”.

Click  (Start) - [Control Panel] - [Hardware and Sound] - [Pen and Touch] - [Flicks] - [Practice using flicks].
To right-click
<Only for model with digitizer>
- Touch and hold the object with the digitizer pen (included) or your fingers, and release it's when a circle surrounding the object appears.(On the Start screen, a circle is not displayed by finger operation.)
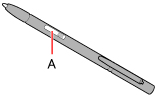
- Press and hold the button (A) of the digitizer pen (included), and then touch the object.
<Only for model with touchscreen>
- Touch and hold the object with the stylus (included) or your fingers, and release its when a circle surrounding the object appears.(On the Start screen, a circle is not displayed by finger operation.)
Operation by touching the screen
Instead of operating the screen with the pointer, you can use the pen (included) or your fingers.
 |
Tap |
Tap the screen once with one finger. |
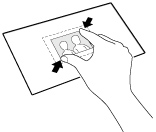 |
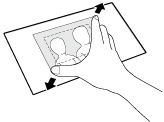
Spread / pinch |
Touch an image or document with two fingers, and spread your fingers apart to zoom in or pinch them together to zoom out. |
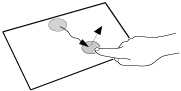 |
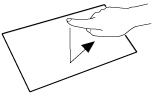
Drag |
Touch an object (file, icon, etc.) and drag your finger to the desired location before removing it to move the object. |
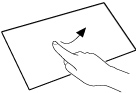 |
Swipe |
Tap with a sweeping motion. |
| Flick |
Tap with a quick sweeping motion. |
Touch the screen with the pen (included) or your fingers
When touching the screen, use only the pen (included) or your fingers on the surface.
Touching the screen with an object other than the pen (included) or your fingertip (a fingernail or metal object, or other hard or sharp objects that may leave a mark) may scar or stain the surface, causing the malfunction.
Do not apply too much pressure when operating the screen
Only a light touch is required to operate the screen.
Applying too much pressure may damage the surface.
Do not operate the computer when such things as dust are on the screen
Do not allow contact with substances that could dirty the screen, such as oil.
Maintaining the performance of the screen
When the screen becomes dirty, wipe it with an approved soft cloth
The screen is specially treated to prevent dirt from adhering to the surface, so dirt can be removed easily using a dry cloth (use only the approved soft cloth).
If the dirt does not come off easily, breathe on the surface and try again.
Do not apply water or solvents to the soft cloth.
Suggestions About Cleaning the LCD Surface
To improve the outdoor visibility of the display, a low reflection coating has been added.
In order to avoid scratches and peeling of this coating, an approved soft cloth has been included to wipe the LCD surface of the computer.
Before using the computer, be sure to read the instructions provided below.
- Be sure to wipe the LCD display to remove fingerprints, etc., with the soft cloth.
- Do not wipe areas other than the LCD display with the soft cloth.
|
<How to use the soft cloth>
- Use the soft cloth when it is dry. Do not apply water or solvents to the soft cloth.
- First, lightly wipe foreign particles and dust adhering to the LCD display on one side of the soft cloth. Do not use force, since the LCD surface may be damaged with the foreign particles or dust.
Next, wipe off fingerprint, etc., with the other side of the soft cloth.
After wiping off foreign particles and dust, wash the soft cloth (refer to the following) to remove the foreign particles and dust from the soft cloth.
- When the soft cloth becomes dirty, wash it with neutral detergent. Do not use bleach or a fabric conditioner (softener), or carry out sterilization by boiling.
- If the LCD gets wet, wipe the surface lightly with the soft cloth.
Clean the screen while the computer is powered off
Cleaning the screen while the power is on may cause the computer to malfunction. Also, dirt on the screen is easier to see when the computer is powered off, and so is easier to clean.
Wash the soft cloth when it becomes dirty
When the soft cloth becomes dirty, wash it with mild detergent. Do not use bleach or fabric conditioner (softener), or try to sterilize the cloth by boiling.
If the soft cloth is dirty, it may be ineffective in cleaning the screen, and in fact may cause dirt to adhere to the screen.
Check the following to prevent the surface of the screen from being scratched
- Are you using your fingers or the pen (included) to operate the screen?
- Is the surface clean?
- Is the soft cloth clean?
- Are you using the pen (included) with the tip extended?
- Is the tip of the pen (included) clean?
- Are your fingers clean?
Things to keep in mind when using the screen
Do not touch the screen outside of the LCD display area
The screen input area is defined by the LCD screen. Touching the screen outside of the display area may result malfunctions or damage to the LCD screen.
Do not apply excessive force to the screen
Do not lift the computer while holding the LCD screen, or allow the screen to be twisted. Do not place any objects on the LCD screen. Any of the above may cause the screen glass to break, or may damage the LCD screen.
Operation response may be slower in low temperature environments
The screen may respond to operations more slowly when using the computer in temperatures less than 5 ºC, but this is not a malfunction. Response time will return to normal when the computer is returned to room temperature.
If the pointer jumps to a location other than where the screen was touched, or if the LCD resolution changes, recalibrate the screen
Perform the procedure of “Screen Calibration” (below).
<Only for model with digitizer>
The screen uses electromagnetic induction and may not work properly near strong electrical field or magnetic field such as:
- Near AM radio base station or relay station antennas
- Near CRT displays that generate strong electromagnetic field noise
Move the screen away from such locations so it will work properly.
Handling the pen (included)
Clean the pen (included) tip and screen prior to operation
Foreign particles can scratch the screen and impede the operation of the pen (included).
Use the pen (included) only for the computer screen
Using it for any other purpose may damage the pen (included) and scratch the screen.
<Only for model with digitizer>
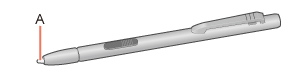
Do not apply excessive force to the tip of digitizer pen
The tip of the digitizer pen (A) is equipped with a sensor. Continued applied pressure to the tip may result in its malfunction or degradation. Make sure excessive pressure is not applied to the tip when storing the digitizer pen.
Screen Calibration
When you cannot point correctly with the pen (included) or your fingers, calibrate the screen by following the steps below.
Perform the calibration as an administrator. A standard user needs to perform the calibration as an administrator before performing the calibration for each user.
Open the Control Panel, and then click [Hardware and Sound] - [Tablet PC Settings] - [Calibrate...].
To open the Control Panel, proceed as follows on the Start screen.
- Right-click any empty location on the Start screen.
- Click [All apps] on the toolbar.
- Click [Control Panel] under “Windows System”.
Click (Start) - [Control Panel] - [Hardware and Sound] - [Tablet PC Settings] - [Calibrate...].
- <Only for model with digitizer>
Click [Pen input] or [Touch input].
<Only for model with touchscreen>
Click [Start].
- If [User Account Control] is displayed, click [Yes].
- <Only for model with digitizer>
Using the digitizer pen or finger, touch each of the “+” target marks one by one, and then click [Yes].
<Only for model with touchscreen>
Using the stylus, touch each of the “+” target marks one by one, and then click [Yes].
CAUTION
If you perform calibration as a standard user (4 target marks), the calibration
data is valid until you sign out. (The data becomes invalid after you have signed out.)
|