|
You can make the settings of the computer’s operating environment (password settings, startup drive selection, etc.)
Preparation
-
Connect an external keyboard to the computer.
Starting the Setup Utility
- Turn on or restart the computer.
- Press «F2» or «Del» while [Panasonic] boot screen is displayed soon after the computer starts the startup procedure.
Alternatively you can click [Click for Enter Setup] at the top left corner on the screen while [Panasonic] boot screen is displayed.
When [Enter Password] is displayed, enter your password.
When you start the Setup Utility with Supervisor Password
- You can make the settings of all items of the
Setup Utility.
When
you start the Setup Utility with User Password
- Note the following:
- In the [Advanced] and [Boot] menus, you
cannot make the settings of all items.
- In the [Security] menu, you can change only
the User Password when [User Password Protection] is set to [No
Protection]. You cannot delete the User Password.
- In the [Exit] menu, you cannot make the
setting of [Load Default Values] and [Boot Override].
- «F9» (Setup Defaults)
does not function.
NOTE
- If the [Panasonic] boot screen is not displayed, turn on the computer while holding down «F2» or «Del». Alternatively you can press and hold security button as soon as the computer starts up.
- The [Panasonic] boot screen may not appear when only the external display is being used.
In this case, as soon as the computer starts up, press «F2» or «Del» several times and start the Setup Utility.
To set Setup Utility, alternatively you can use pen input and touch input.
Using touch screen:
Double-click the setting value to be changed, select the new value, and click it again.
Using on-screen keyboard:
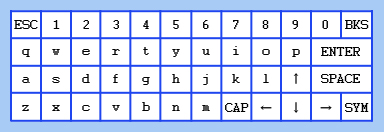
To input characters and symbols, click  at the upper right corner of the Setup Utility screen to display the on-screen keyboard.
To operate special keys such as a function key, click [SYM] on the on-screen keyboard so that the key is highlighted as illustrated below.
Information Menu
Underlined items are the factory presets.
| Language |
English
French
Japanese |
Product Information
Model
No.
Serial No. |
Computer information
(cannot be changed.) |
System Information
Processor
Type
Processor Speed
Memory Size
Available Memory
Hard Disk
|
Computer information
(cannot be changed.) |
BIOS Information
BIOS
BIOS Configuration
Embedded Controller
Intel(R) ME Firmware
Accumulative Operating Time
Access Level |
Computer information
(cannot be changed.) |
Main Menu
Underlined items are the factory
presets.
System
Date
- Day of the Week/Month/Day/Year.
- You can use «Tab» to move
the cursor.
|
[xxx xx/xx/xxxx] |
System
Time
- 24-hr. style.
- You can use «Tab»
to move the cursor.
|
[xx:xx:xx] |
Main Configuration
| SAS Button |
Not Assigned
F1
F2
F3
F4
F5
F6
F7
F8
F9
F10
F11
F12 |
| Handle Button |
Disabled
Enabled |
Display
- The display during the Windows start-up process.
When an external display is not connected, the information appears on the internal LCD even though the [External Monitor] is selected.
|
External Monitor
Internal LCD |
| Battery Charging Indicator |
On Continuous
Flashing |
| Power On AC |
Disabled
Enabled |
| Environment |
Normal Temperature
High Temperature
Auto |
Battery 1 Current Status
- Only when [Environment] is set to [Auto].
|
Depending on the battery status, either “Normal Temperature” or “High Temperature” is displayed. |
Battery 2 Current Status
- Only when [Environment] is set to [Auto].
|
Depending on the battery status, either "Normal Temperature" or "High Temperature" is displayed. |
 Touchscreen Calibration Touchscreen Calibration
- Select [Start Calibration], and perform screen calibration.
Using the digitizer pen or stylus, touch each of the “+” target marks one by one, and then click [Yes].
|
Enter the sub-menu. |
| Optical Kit Configuration
|
Enter the sub-menu. |
| Ambient Light Sensor Configuration |
Enter the sub-menu.*1 |
*1 : The sub-menu that appears when [Ambient Light Sensor Configuration] is selected:
|
Automatic Display Brightness |
Disabled
Enabled |
|
Ambient Light Sensor Threshold |
Disabled
High
Mid
Low
|
Advanced Menu
Underlined items are the factory presets.
| CPU Configuration |
Enter the sub-menu.*2 |
*2 : The sub-menu that appears when [CPU Configuration] is selected:
Execute-Disable
Bit Capability
- [Enabled] indicates that this computer supports
hardware-based Data Execution Prevention (DEP).
|
Disabled
Enabled |
| Intel(R)
Hyper-Threading
Technology |
Disabled
Enabled |
| Core
Multi-Processing |
Disabled
Enabled |
| Intel(R)
Virtualization Technology |
Disabled
Enabled |
| Intel(R)
Turbo Boost Technology 2.0 |
Disabled
Enabled |
Peripheral Configuration
Serial Port Settings
- Used to configure the GPS and Barcode Reader (Serial Port A)
|
Enter the sub-menu.*3 |
*3 : The sub-menu that appears when [Serial Port Settings] is selected:
| Serial Port A |
Disabled
Enabled
Auto |
I/O IRQ
- Only when [Serial Port A] is set to [Enabled].
|
3F8/IRQ4
2F8/IRQ3
3E8/IRQ7
2E8/IRQ5 |
| GPS
|
Disabled
Enabled
Auto
|
I/O IRQ
- Only when [GPS] is set to [Enabled].
|
3F8/IRQ4
2F8/IRQ3
3E8/IRQ7
2E8/IRQ5 |
Barcode Reader
- Only for model with Barcode Reader
|
Disabled
Enabled
Auto
|
I/O IRQ
- Only when [Barcode Reader] is set to [Enabled].
|
3F8/IRQ4
2F8/IRQ3
3E8/IRQ7
2E8/IRQ5 |
Trigger Mode
- Only when [Barcode Reader] is set to [Enabled] or [Auto].
|
Software
Hardware
|
HDD Controller Setting
Do not change this setting.
If you do, the operating system will not function correctly. |
Compatible
AHCI |
| LAN
|
Disabled
Enabled |
|
Power On by LAN
|
Deny
Allow |
|
Wireless Configuration |
Enter the sub-menu.*4 |
*4 : The sub-menu that appears when [Wireless Configuration] is selected:
Wireless LAN
- Only for model with wireless LAN
|
Disabled
Enabled |
Wireless WAN
- Only for model with wireless WAN
|
Disabled
Enabled |
Bluetooth
- Only for model with Bluetooth
|
Disabled
Enabled |
Smart Card
- Only for model with Smart Card
|
Disabled
Enabled |
| USB Port |
Disabled
Enabled |
Left Port Setting
- Can be changed only when [USB Port] is set to [Enabled].
|
USB2.0
USB3.0 |
| Cradle USB Port |
Disabled
Enabled |
| Legacy USB Support |
Disabled
Enabled |
Camera
- Only for model with Camera
|
Disabled
Enabled |
Boot Menu
Underlined items are the factory presets.
Boot Mode
-
Setting [Fast] will skip the [Panasonic] boot screen
normally displayed immediately after the computer is turned on.
The time
required to display the Windows boot screen will become shorter.
Since the [Panasonic] boot screen is not displayed, press
and hold «F2» or «Del» and turn the
computer on to start the Setup Utility.
- If the startup from USB devices is not possible, set
[Compatible] and retry.
However, setting [Compatible] will require longer time
to display the Windows boot screen than setting [Normal].
- This can also be configured in Quick Boot Manager.
|
Fast
Normal
Compatible |
Boot Option Priorities
Boot Option #1
|
USB Floppy Disk*5 |
Boot
Option #2
|
Hard Disk |
Boot
Option #3
|
USB Optical Drive |
Boot
Option #4
|
LAN |
Boot
Option #5
|
USB KEY |
Boot
Option #6
|
USB Hard Disk |
To change the boot order
The default order is [USB Floppy Disk *5] → [Hard Disk] → [USB Optical Drive] → [LAN] → [USB KEY] → [USB Hard Disk].
- Press «Enter» on the boot device you want to change and select the boot device from the following menu.
- When a selected boot device in the following menu already exists in either of the [Boot Option (#1 to #6)], the boot device appears at the newly selected position by switching the positions with the original boot device that existed before at the position.
- When you select [Disabled] in the following menu, the disabled [Boot Option] is ignored and the boot device in the next [Boot Option] operates.
*5 : The operation is confirmed by Panasonic USB floppy disk drive (optional: CF-VFDU03U).
NOTE
- To boot from the following devices, make the settings as below.
| To boot from |
You need to set |
| USB connected device : |
[Legacy USB Support] to [Enabled] |
|